Buddhabrot Renderer, Part 1
For this assignment, we will write a program to render the very well-known Mandelbrot set using a less well-known, and very computationally intensive, approach. Along the way, you will get to explore a number of useful C++ language features, and tools used by many C/C++ programs.
The Mandelbrot Set
The Mandelbrot set is one of the most well-known fractals; virtually everyone recognizes its iconic shape:

The Mandelbrot set is generated by iterating a specific function \(z_{n+1} = z_{n}^{2} + c\), where all values are complex numbers.
Initially, \(z_0 = 0 + 0i\). The point \(c\) is taken somewhere from the region \((-2 - 1.5i)\) to \((1 + 1.5i)\). The above operation is iterated until the series either diverges, or it remains bounded. This is approximated by the following conditions:
- If \(\lvert z_n \rvert > 2\) then the series will diverge, and \(c\) is not in the Mandelbrot set. The iterated calculation is terminated once this condition is encountered, since every subsequent iteration will also have this characteristic.
- If the above operation is iterated up to some iteration limit, without \(\lvert z_n \rvert > 2\), then it is assumed that the series will not diverge, and \(c\) is in the Mandelbrot set.
Of course, this is an approximation. With large enough compute power, and high enough precision in your arithmetic, you can explore the endless detail in the Mandelbrot set. But, this approximation is certainly fine enough to draw pictures like the one above. In that picture, all black pixels are part of the Mandelbrot set. All colored pixels are not part of the Mandelbrot set, and the pixels are colored based on how many iterations were necessary before the \(\lvert z_n \rvert > 2\) condition was encountered.
The Mandelbrot Set and the Logistic Map
If you have 20 minutes to spare, check out this great Veritasium video about the Mandelbrot set, another remarkable mathematical phenomenon called the logistic map, and many physical processes.
Buddhabrot Rendering
The Mandelbrot set is very fun to explore just using the above simple rendering technique, but there are numerous other ways to render and explore this fascinating mathematical construct. One of the more interesting and compute-intensive approaches is called Buddhabrot, which works like this:
- Initialize all pixel values in the generated image to zero
- \(c\) = a random point in the region \((-2 - 1.5i)\) to \((1 + 1.5i)\)
- Use the above iterated function to see if \(c\) is in the Mandelbrot set or not. Record all \(z_i\) for \(i > 0\). (We don’t record \(z_0\) because is always equal to zero)
- If \(c\) is not in the Mandelbrot set (i.e. the function diverges), then plot all \(z_i\) (\(i > 0\)) in the image as follows: Find the pixel that each \(z_i\) falls into (interpret the real part of \(z_i\) as the x coordinate of the pixel and the imaginary part of \(z\) as the y coordinate of the pixel), and increment the pixel value by 1.
This process is repeated many many times, for many random starting points. (One million random starting locations is at the low end of what is required.) Once this has been completed, the image is normalized, and the result looks something like this:
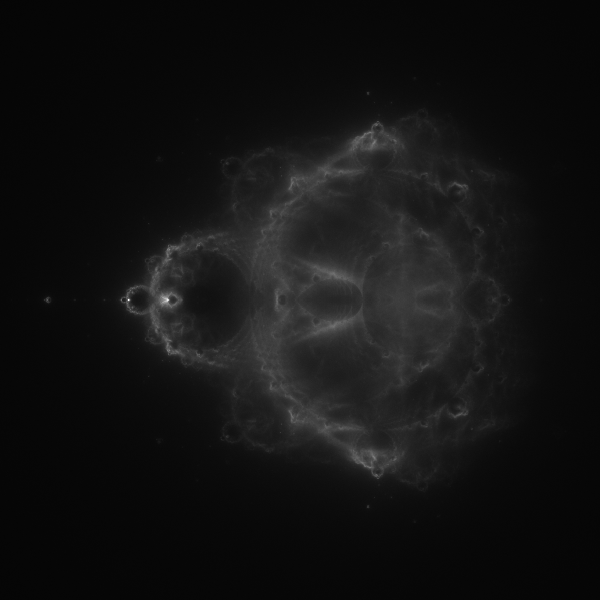
In other words, for points \(c\) that escape (and are therefore not in the Mandelbrot set), we record the entire escape trajectory, and then we use these points to draw a density map.
By normalizing the image we mean that depending on the representation width of each pixel in the image to generate, we need to scale the counters for each pixel such that the maximum value is still representable by the data type that represents a pixel in the image. The trajectory recording we will always perform using size_t as the integer type (which is a 64 bit integral type), while the representation type for each image pixel could be as small as unsigned char (which usually is a 8 bit data type).
Program Overview
For this assignment you will start creating a Buddhabrot renderer called buddhabrot that is able to generate pictures like the above. We are going to create this as a command-line tool that takes its parameters from the command line, and generates its result to a file with the given file name. Errors and progress information will be generated to standard error (std::cerr). For example, the above image was generated with an invocation like this:
./build/buddhabrot 600 50000000 5000 image.bmp
The arguments are as follows:
- The first argument is the size of the image to create. The above invocation creates a \(600\times600\) pixel image.
- The second argument is the number of random points to generate. The above invocation generates
50,000,000starting points. (Recall that only the points that escape will be used to update the image.) - The third argument is the maximum number of iterations to try before declaring that a point \(c\) is within the Mandelbrot set. The above invocation tries applying the \(z_{n+1} = z_{n}^{2} + c\) function
5000times; if the function never exceeds \(\lvert z_i \rvert > 2\) over this many iterations, the point \(c\) is considered to be inside the Mandelbrot set. (And, therefore, its trajectory won’t be used to update the image.)
The following sections will describe how to implement the various parts of this program. Note that we are providing some initial files to help constrain the architecture of your solution, so that it’s easier to extend the program over the next few assignments.
Computing the Mandelbrot Function
A C++ header file mandelbrot.hpp is being provided for you in the starter repository, to guide your implementation. In the file mandelbrot.cpp, you will need to provide an implementation of the compute_mandelbrot() function that operates as described above. Here are some more details.
The compute_mandelbrot() function takes the point \(c\) as an argument, and then iterates the Mandelbrot computation up to a maximum of max_iterations times. The inputs and results of the calculation are stored into a mandelbrot_point_info struct, which your implementation must return. (Note that this struct is not heap-allocated; you are not returning a pointer to the struct. Because of modern’s C++ move operations and copy elision, it is not expensive to return a struct like this):
struct mandelbrot_point_info {
    size_t max_iterations;
    size_t num_iterations;
    std::vector<std::complex<double>> trajectory;
    bool escaped;
};
These details will be unsurprising, but just to be very specific:
- The info-struct’s
max_iterationswill be set to the same value as passed to the function. - The info-struct’s
num_iterationsvalue should be the number of iterations your function performed. It should be no more than themax_iterationsvalue, and it will almost certainly be much less thanmax_iterationsif the point escapes. - The info-struct’s
escapedvalue should be set totrueonly if the input point \(c\) escapes withinmax_iterationsof iterated calculations. Otherwise, it should be false to indicate that \(c\) is within the Mandelbrot set. - If the caller of the function passes
trueforcollect_points, your implementation should store the \(z_i\) values for \(i > 0\) in thetrajectorymember. Ifcollect_pointsisfalsethen don’t store the intermediate points.
Never store \(z_0\), since \(z_0\) is always \(0\), and this is uninteresting. The consequence of this is that if
collect_pointsistrue, the info-struct’strajectorymember will always have a size equal to the returnednum_iterationsvalue.
Generating the Buddhabrot Image
Once you have the Mandelbrot calculation implemented, it’s time to build the Buddhabrot rendering program around this engine.
The rest of your work for this assignment will go into a file buddhabrot.cpp. Specifically, you will put your main() implementation into this file, along with a number of important helper functions.
The file buddhabrot.cpp also contains a small class to be used for collecting the Buddhabrot traces: ImageData. This is very similar to the Matrix class you have been using before, with the only difference that it stores elements of type size_t instead of double. This class exposes two helper functions min_value and max_value that you have to implement to return the smallest and largest values in the generated image. These will be needed to properly normalize the resulting image data later.
Command-Line Arguments
We have seen that many C/C++ programs start with this function:
int main(int argc, char **argv)
When you invoke your function, argc is the number of entries in the array argv. The first value, argv[0], is always set to the name used to invoke your program, and the remaining values in argv are the arguments passed to the program. For example, with the above invocation, argc = 4, and argv is {"./buddhabrot", "600", "50000000", "5000", "image.bmp", NULL}. Note that argv[argc] = NULL; this is set up by the OS when your program starts.
You will need to convert these arguments to integer values (except for the file name). For now, you can use the std::atoi function to convert strings to numbers. Note that this function does not allow for checking whether it has converted the string completely. We will address this problem later.
Your program should parse the following arguments:
- Image size in pixels. We assume that the image is always square, so you only need one argument for this.
- Total number of random starting points to generate.
- Maximum iteration limit for testing a point \(c\) for membership in the Mandelbrot set.
- The filename where to write the generated image to.
All of these values (except the last one) can be of type int.
If the program doesn’t get the correct number of arguments, report an error to std::cerr, and return an exit code of -1. (In other words, main() should return -1 in this situation.) Most importantly, don’t crash!
Correspondingly, if your program runs successfully, return an exit code of 0.
Rendering the Buddhabrot
Besides parsing arguments, your main() function can also implement the main loop of the Buddhabrot calculation:
- Generate a random complex number \(c\) in the range \((-2 - 1.5i)\) to \((1 + 1.5i)\)
- Call your
compute_mandelbrot()function on the value \(c\), with the maximum iteration limit specified by the user. Collect the points that the iterated function generates along the way. - If the point \(c\) escapes, update the output image by incrementing every pixel that \(c\)’s escape-path touches. If the point \(c\) doesn’t escape, do nothing.
- Repeat this sequence of steps as many times as the user requested.
You will need a class to represent the image data with one value per pixel. We will use a ImageData instance to represent this data. Later we will convert this into the actual bitmap image.
Progress Information
As your program computes, it should output something to tell the user that it is making progress. To this end, your main loop should output a “.” (period) after every 100'000 points. You can do this easily if you have a loop variable e.g. i, and output a dot if i % 100000 == 0.
This progress output should go to standard error (std::cerr), not standard output (std::cout). We will make this output much more sophisticated later.
Generating Random Complex Numbers
The C Standard Library has provided a number of random number generators over the years: rand(), random(), drand48(), and so forth. These generators have various limitations, and the use of some are even discouraged. The man page for rand() even has this title: "rand, rand_r, srand, sranddev -- bad random number generator". The C++ Standard Library finally addressed this issue in C++11, providing a set of abstractions for implementing sources of pseudo-randomness and true randomness, and also for generating random values with different distributions. It is finally useful for doing scientific and mathematical computing.
All of this great functionality is provided in the C++ <random> header. You are encouraged to read the documentation about the C++ <random> library so you can learn about all of the great features it contains, but so many features also makes it difficult to figure out what to use in our program. So, we’ll make it easy:
- Use a
std::mt19937object as your pseudo-random generator. - Use
std::random_deviceto seed the random number generator. - Use one
std::uniform_real_distributionobject to generate the real component of your complex numbers, and initialize it for the range \([-2, 1)\). - Use another
std::uniform_real_distributionobject to generate the imaginary component of your complex numbers, and initialize it for the range \([-1.5, 1.5)\). - Both of the
std::uniform_real_distributionvariables can draw from the same random generator.
All of these variables should live outside the main loop that generates random complex numbers and does the Mandelbrot calculations, so that you get good random results, and also so that you don’t incur the overhead of initializing them every iteration through the loop.
You will notice these ranges \([-2, 1]\) and \([-1.5, 1.5]\) showing up regularly in your implementation. Define C++-style typed constants for these values. Don’t use the C-style
#defineto define typed constants in C++ programs.
Updating the Image
Once you have generated a random complex number \(c\), and you’ve used the compute_mandelbrot() function to determine that it isn’t in the Mandelbrot set, you will need to update the image with the point’s escape-path. There are two helper functions you will implement to do this.
-
The
normalize(min, max, value)function simply normalizes a value to a \([0, 1]\) range. This function is useful in several places in the Buddhabrot calculation, so why not factor it out into a helpful tool.- Basically, if
value == min, the function should return0. Ifvalue == max, the function should return1. Ifvalueis halfway betweenminandmax, it should return 0.5. - You don’t have to do anything special if
value < minorvalue > max; for example, it’s fine if your function returns a value< 0or> 1in these cases. - However, you should assert that
max > minin your function; it simply wouldn’t make any sense otherwise.
This function will be useful for two things: normalizing the generated pixel values and to scale the pixel coordinates from the trajectory (which are in the ranges \([-2, 1]\) and \([-1.5, 1.5]\)) to the image sizes (which are \([0, image_with]\) and \([0, image_height]\)).
- Basically, if
-
The
update_image(image, info)function should update the image with the contents of theinfo.points_in_pathcollection. This update is very straightforward.for each point in info.points_in_path: if the point is outside of the region (-2 - 1.5i) to (1 + 1.5i): skip the point otherwise: x = map the real component from [-2, 1] to an integer [0, image_size - 1] y = map the imaginary component from [-1.5, 1.5] to an integer [0, image_size - 1] increment the value for the pixel (x, y) in the image # Since the Buddhabrot image is symmetrical across the X-axis, # we can get extra points "for free" by mirroring the result! increment the value for the pixel (x, image_size - y - 1) in the image
As you might guess, the normalize() function can be very useful in doing the above computations as well.
As the values collected for each pixel may grow very large, we use a ImageData to store the data for each of the pixels, where each value in the matrix is used to the set the corresponding value in the generated bitmap image later.
Outputting the Image
You might think that outputting an image from a program is complicated, but there is a family of simple image formats named bmp that makes this task very easy. The starter repository contains a sub-directory EasyBMP that holds code allowing to simplify writing images with this format.
Essentially, after #includeing "EasyBMP/EasyBMP.h" you construct a new instance of the type easy_bmp::BMP and set the color-depth and size of the image to generate. We will generate 24 bit per pixel images, which will allow us to generate monochrome or color images. For instance:
    easy_bmp::BMP image;
    image.SetBitDepth(24);
    image.SetSize(1280, 1280);
Getting or setting a pixel value is simple as well:
    auto pixel_vale = easy_bmp::RGBApixel(red, green, blue);
    image.SetPixel(pixel_x, pixel_y, pixel_value);
where pixel_x and pixel_y represent the coordinate of the pixel to change, which should be in the range of \([0, image_size - 1]\) (the upper left corner of the image corresponds to the pixel coordinate \((0, 0)\)). The values for red, green, and blue should be in the range of \([0, 255]\) and represent the color channels for the generated pixel color. If all three color channels have the same value, the generated image will be monochrome.
Last, but not least, you can save the image to disk by writing:
image.WriteToFile(file_name);
where file_name should be the string that holds the filename to use.
In order to generate the actual pixel values, you will need to scale the whole image to be representable by red, blue, and green byte (char) values. The algorithm of generating the image will be:
1) Find the minimum and maximum pixel values in the entire image. In all likelihood, these value will be much larger than 65536. Implement the ImageData::min_value and ImageData::max_value helper functions to extract those values from the image data.
2) Output the image data in the format above, using a “maximum value” of 255. This means you will need to scale each pixel’s value to the range [0..255], using the minimum and maximum values you found in step 1 to scale the values appropriately. You may again find the normalize() function to be very helpful in this calculation.
Commenting
Make sure to document your code, focusing specifically on writing a reasonably detailed header comment for every function you implemented this week.
Testing
Once you have completed the above steps, it’s time to start testing and debugging your program. While all tasks are straightforward, it’s easy to be tripped up by the vagaries of C++ floating-point and integer math, and other irritating issues you might encounter. You should stick with low-resolution outputs until you have gotten everything working properly. Then, if you want, you can crank up the settings!
This kind of program will greatly benefit from turning on compiler optimizations, so make sure to do the actual image generation with an executable that was compiled in Release mode. If you do this, you will notice a significant performance improvement. Just be aware that this will hinder debugging your program, so you may not want to try this until your code is working well.
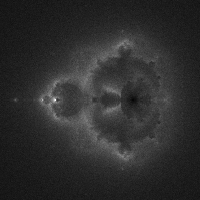
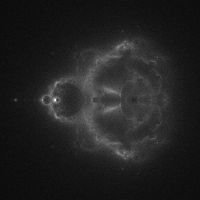
Here are some example outputs for you to compare against:
./build/buddhabrot 200 1000000 100 img_100.bmp
./build/buddhabrot 200 1000000 500 img_500.bmp
./build/buddhabrot 200 1000000 1000 img_1000.bmp
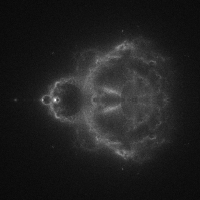
You will notice that as you increase the iteration limit, more and more detail will appear in the Buddhabrot output. Also, as you increase the total number of points generated, the image will become less noisy as more detail is filled in. However, it’s very easy to sink a lot of time into generating results, so you may want to avoid being too ambitious in your computations.
As a simple example, here is another version of the first image above, with 10M points instead of 1M points:
./build/buddhabrot 200 10000000 100 img_100.bmp

Finally, if you accidentally use the points that don’t escape, your plot will look more like this, showing the many lobes of the Mandelbrot set:

Parsing Command-Line Arguments
Perhaps you have used programs with sophisticated command-line argument processing. For example, git has very sophisticated command-line processing. It is very good to learn how to implement this kind of functionality, so that you can write sophisticated command-line tools that give users a lot of flexibility in how they are used.
The getopt() and getopt_long() functions are widely used to implement such argument processing, and it’s a very good idea to learn how to use them. You can read about these functions here or here. The best part of these documents is that they also include example code, which you can copy into your program’s main() function and then edit it as you see fit.
Update your main() function to parse the following arguments with getopt_long():
-s|--size <img_size>- image size in pixels. This should default to 512.-p|--points <num_points>- total number of random starting points to generate. This should default to 1,000,000.-i|--iters <max_iters>- maximum iteration limit for testing a point for membership in the Mandelbrot set. This should default to 1,000.-o|--output <filename>- filename to use to write the image data to. This should default to"buddhabrot.bmp".
Note that when you change your program to use getopt_long(), you will no longer require that the user specifies four arguments, because there are reasonable defaults for all arguments.
Program Usage Information
Create a usage() function that prints out the program usage to std::stderr. The usage should summarize the details given in the previous section. If you have seen other program usage messages, you have probably noticed that they all follow a similar pattern:
usage : buddhabrot [options] filename ...
        Brief description of the program's main purpose.
        It takes a filename and maybe some other details.

        -a1|--arg1 has some effects.
        -a2|--arg2 <value> has some other effects.
In general:
- Square brackets “
[arg]” indicate optional arguments or values. - Angle brackets “
<value>” tend to be used around argument values. - Different ways of saying the same thing can be separated with a “
|” pipe character. For example: “-p|--points <num_points>” - Multiple positional parameters can be indicated with text like “
file1 file2 ...”.
If you don’t accept a varying number of arguments, don’t use “
...”!
If you want to be particularly clever, your
usage()function can takeargv[0]as an argument, so that it can print out the name of the program as it was specified on the command-line. This way you don’t need to hard-code your program’s name into your program.
Make sure your program outputs the usage information if any issues are encountered with the command-line arguments, and/or if the user passes -? or -h to your program. If your program outputs usage information, it should then terminate, rather than going on to do any computations.
Verifying Numeric Arguments
Until now, you are likely using a function like std::atoi to parse integer arguments. (This is what we suggested in part 1.) In general, this is not recommended because std::atoi has no way of indicating that parsing failed. A much better approach is to use std::stol, which indicates what part of the input string was successfully parsed by the function. In our case, we expect the entire string to be parsed, so we can write code like this:
// str is a C-style string, which is NUL (zero) terminated.
char *str = ... ;  // Some string to parse into an int
char *str_end;

// str_end will be updated to point to the location in the string where
// the parsing function stops parsing.  If str_end ends up pointing to
// the NUL character, the entire string was parsed.
int val = std::stol(str, &str_end, /* base */ 10);
if (*str_end != 0) {
    ...  // Complain that the string didn't represent an integer!
}
Of course, there are other details to check as well, such as whether the number falls into a reasonable range, etc.
Update your code to use std::stol to detect parsing issues with command-line arguments. If any errors are encountered, show your program’s usage and then exit.
Since you have up to three integer arguments to parse, you should probably create a helper function that parses and verifies the integer arguments, to minimize code duplication. If you want to be particularly clever, you can also have this function verify that the integer falls into an acceptable range, and reports the issue to the user if it doesn’t.
Program Configuration
Finally, update your program to print out its configuration to standard error, before it continues onto its computations. This way, the user will get positive feedback that the program is using the configuration that the user specified.
To reiterate, the configuration output should include:
- Image size in pixels
- Total number of random starting points to generate
- Maximum iteration limit for testing a point for membership in the Mandelbrot set
- The filename to use to write the image to
Once you have finished testing and debugging your program, commit and push these files as part of your submission:
mandelbrot.hppandmandelbrot.cppbuddhabrot.cpp
Next up: Submission