Table of Contents
Warmup
Preliminaries
In the lectures we introduced vector spaces — sets of objects that obeyed certain properties with respect to addition and with respect to scalar multiplication.
What that definition did not include was any way to measure the “size” of a vector. Measuring the size of a vector also gives us a way to measure the distance between two vectors; since the difference between two vectors is also a vector, being able to measure the size of a vector also lets us measure the distance between them.
In plane geometry, points in the plane are represented as pairs of numbers, and it is fairly easy to verify the vector space properties with pairs and see that pairs of numbers can represent a vector space.
The figure below illustrates how we customarily think about measuring distances in the plane.
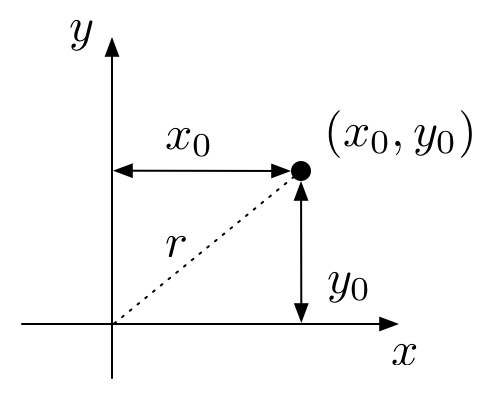
That is, for a vector represented as the pair \((x_0, y_0)\), the length of that vector, i.e., its distance from the origin, is
\[r = \sqrt{x_0^2+y_0^2}\]We can generalize that notion of distance to \(N\)-tuples of numbers (\(N\)-dimensional vectors) in the following way. Let the vector \(x\) be the \(N\)-tuple of real numbers:
\[\begin{aligned} x = \left[\begin{array}{c} x_0 \\ x_1 \\ \vdots \\ x_{N-1} \end{array}\right] . \end{aligned}\]We use the shorthand for saying that \(x\) is an \(N\)-tuple of real numbers with the notation
\[x\in R^N\]Then, the distance of the vector \(x\) to the origin is
\[||x||_2 = \sqrt{\sum_{i=0}^{N-1} x_i^2} = \left( \sum_{i=0}^{N-1} x_i^2 \right)^{\frac{1}{2}} .\]Distance expressed as \(\| \cdot \|\) is called a “norm” and the 2-norm above is also called the Euclidean norm (in analogy to the plane geometry interpretation of distance).
There are two other common norms in numerical linear algebra that can also provide useful notions of distance, respectively the 1-norm and the infinity (or max) norms:
A vector space with a norm is called a normed vector space; if the vector space is complete in the norm, it is called a Banach space. If the norm is defined by an inner product, it is called a Hilbert space.
As with the definition we had in lecture about vector spaces, any function \(f:V\rightarrow R\) can be a norm on a vector space \(V\), provided it satisfies certain properties:
- \[\begin{aligned}&f(x) \geq 0 \:\:\: \text{for all} \:\:\: x \in V\end{aligned}\]
- \[\begin{aligned}&f(x+y) \leq f(x) + f(y) \:\:\: \text{for all} \:\:\: x, y \in V\end{aligned}\]
- \[\begin{aligned}&f(\lambda x) = |\lambda| f(x) \:\:\: \text{for all} :\:\: \lambda\in C \:\:\text{and}\:\: x \in V\end{aligned}\]
- \[\begin{aligned}&f(x) = 0 \:\:\: \text{if and only if} \:\:\: x = 0\end{aligned}\]
The interested reader can verify that the 1-norm, 2-norm, and infinity
norms defined above satisfy these properties.
More on Visual Studio Code
If you are interested in making better use of Visual Studio Code, Microsoft has a number of tutorials on-line about how to use some of its various features:
I particularly encourage you to explore using Intellisense and how to compile, find errors, and debug from within VS Code.
Defensive Programming and Assertions
Maurice Wilkes was one of the founders of modern computing and, in some sense, of debugging. One of his most poignant quotes is:
It was on one of my journeys between the EDSAC room and the punching equipment that “hesitating at the angles of stairs” the realization came over me with full force that a good part of the remainder of my life was going to be spent in finding errors in my own programs.
Over the years, defensive programming has evolved as a set of techniques that can be used to help you find your own errors. One fundamental part of the process of defensive programming is to develop
your program so that it supports two different modes of compilation and execution: debug mode and release mode. In debug mode, a program is first of all, compiled to enable use of a symbolic debugger (using the -g flag to the compiler, or, equivalently, build using Debug mode). In addition, the program itself includes self-checks, or assertions, (inserted by the programmer) to insure that necessary program invariants hold.
Assertions
Note that these self-checks (assertions) are not the same as error-checking. Assertions are there to catch mistakes that you make while programming, which mistakes would result in erroneous behavior and/or catastrophic failure of your program. Error-checking catches mistakes that the user of your program makes and is part of normal program logic for a correctly functioning program. Incorrect logic (aka “bugs”) are errors that are not part of normal program logic and are what we want to try to prevent with assertions. Importantly, assertions are removed (automatically) from the release mode of the program, whereas error-checking is always enabled.
Correct program logic depends on invariants holding during the course of execution. During development and debugging it can be useful to check these invariants and to terminate the program at the point where an invariant is violated. C and C++ provide a checking facility for asserting such invariants in the <cassert> header.
There is a concise description of the principles of using assert here. Exactly how and where to use assert when you are programming will largely be up to you, but you should add it to your arsenal of tools and techniques for programming in this course (and beyond) so that the remainder of your life can be spent doing more interesting things than finding errors in your own programs.
An assertion statement will print a message and cause a program to halt if the assertion fails, that is, if the expression passed to it evaluates to false or, equivalently, to zero (false and zero are essentially the same value in C/C++). As mentioned above, assert statements are removed from your program for its release mode. This removal is done functionally rather than physically — you don’t actually go through the code and remove the assert statements. Rather, they are turned into empty statements in a preprocessing step by the compiler if the macro NDEBUG exists in the environment prior to inclusion of the header file <cassert>.
The
NDEBUGmacro is automatically defined by CMake whenever you build your project inReleasemode. You may see a warning when compilingassert1.cpporassert2.cppinReleasemode that theNDEBUGmacro is being redefined. You can safely ignore this warning.
Try the following three programs (assert0, assert1, and assert2).
#include <cassert>
#include <print>

using namespace std;

int main() {
  assert(1 == 1 && "This is true");       // will not be triggered
  assert(1 == 0 && "This is never true"); // will be triggered
  std::println("Hello World");
  return 0;
}
#define NDEBUG 1

#include <cassert>
#include <print>

using namespace std;

int main() {
  assert(1 == 0 && "This is never true");
  std::println("Hello World");
  return 0;
}
#include <cassert>
#include <print>

using namespace std;

#define NDEBUG 1

int main() {
  assert(1 == 0 && "This is never true");
  std::println("Hello World");
  return 0;
}
Which version prints “Hello World”? Try running the three examples both in Debug mode and in Release mode.
The technique of using the logical “and” operation (&&) in addition to a string lets you include a helpful message when the assertion line is printed when there is a failure. The string is not necessary, though, writing assert(1 == 0) would be sufficient to trigger a failed assertion.
What you pass to
assertis something you expect to always be true for correct operation of the program and, again, is a check that will be removed for the release mode of your program. For example in thesqrtexample we have been using in lecture you might include an assertion that the input value is non-negative:namespace csc4700 { double sqrt(double y) { assert(y >= 0); double x = 0.0, dx; do { dx = -(x * x - y) / (2.0 * x); x += dx; } while (std::abs(dx) > 1.e-9); return x; } }In this case we use the
assertto check a pre-condition that must be met in order for the function to work as advertized. If the argument is negative, the function may simply produce a wrong result.
Answer the following question in
results/answers.md:
- Which of the versions of the
assert0,assert1, andassert2examples trigger the assertion when run inDebugandReleasemodes. Explain.
Passing -DNDEBUG=1 to disable assertions
Making sure the assertions are removed is an important distinction between Debug and Release modes of a program. We have seen how they can be elided with the use of the NDEBUG macro. But if we think about how we would switch between Debug and Release mode in this way – we would be (manually) inserting and remove NDEBUG from all of our files every time we changed modes. And we are sure to make mistakes (not to mention waste time) in doing so. At this point you should be thinking “hmm, doing something boring and repetitive by hand – there must be a way to automate that.” And in fact there is. One can pass macros to the C++ compiler from the command line using the -D flag. I.e., to define NDEBUG, we add -DNDEBUG=1 to the set of flags we pass to the compiler. This is done by the CMake build system generated if you build in Release mode.
In general, avoiding work for the sake of avoiding work is called “laziness” and is not considered to be a virtue. However, in the context of programming, we are avoiding boring and repetitive and mindless work so that we can instead focus our energy on interesting and challenging tasks. This kind of laziness is a virtue. It also sometimes leads one not to just use tools to save time – but to develop altogether new tools. In this case you might end up spending more time developing your time saving tool than the time you actually save. Moderation is also a virtue.
Compiler Pickiness
Since a compiler is built to translate a program written in a given program language, it can also be used to analyze how programs are written. Both clang (llvm) and g++ use the flag -Wall to enable pickiness, meaning the compiler will issue warnings for just about anything in your program that might be suspect. Warnings are not fatal, your program will still compile and run if warnings are issued. But, as part of defensive programming, your programs should always compile cleanly with -Wall enabled. For maximal pickiness you can additionally use -Wextra and -pedantic.
In order to add additional compiler flags to your build you can use the CMake command
add_compile_options(). For instance, simply add:add_compile_options(-Wall)to the
CMakeLists.txtto try this out.
Your code should always compile cleanly with
-Wallenabled. No warnings and no errors.
Language Level Support
The C++ programming language is still being actively extended and improved upon by the ISO standards committee responsible for it. There are four versions of the language that represent major milestones in the evolution of the language: C++98, C++11, C++14, C++17, C++20. And the sixth was recently approved: C++23. (The committee is targeting a new release every three years at least through C++29.)
Although standards are developed (and named) by the standards committee, it does take some time for compilers as well as programs themselves to catch up to the standards. Although it is currently 2025, the default level of language support for clang and g++ is still C++98. This is a reflection more that the vast majority of extant C++ code is written in C++98 than it is a reflection of the timeliness of the compiler writers.
To specify a given level of language support (to enable certain features that are in one that are not in an earlier one), we can pass one of the following flags to the compiler: “-std=c++11”, “-std=c++14”, or “-std=c++23”. In our CMake based build system, this is achieved by adding a set(CMAKE_CXX_STANDARD 23) command to the CMakeLists.txt.
Since C++23 is still fairly new, you should not expect it to be fully supported at this time (but neither will you need to use many of its features, if any at all).
For this course we generally will use C++23 as it provides us with facilities that simplify writing code, like e.g., std::print.
Next up: Performance